> ## Documentation Index
> Fetch the complete documentation index at: https://docs.intellikon.ai/llms.txt
> Use this file to discover all available pages before exploring further.
# Aegis settings
> Set how quickly your team must reply, choose the categories customers pick from, and decide how questions are answered before they become tickets.
Aegis settings apply to everyone in your workspace. They set how quickly your team must reply to each priority, which categories customers choose from when they raise a ticket, and whether Vera answers your team's questions before they raise a ticket. Open them from **Settings** at the bottom of the Aegis sidebar.
## Before you start
Tenant Owners, Workspace Admins and Workspace Members can see Aegis settings. Only Tenant Owners and Workspace Admins can change them.
## Set reply times
Go to **Response-time SLA targets**.
For **P1**, enter how many minutes your team has to reply. Aegis shows each time in hours and minutes underneath.
For **P2**, enter how many minutes your team has to reply.
For **P3**, enter how many minutes your team has to reply.
Select **Save settings**.
Studio shows **Saved** next to the button. The time counts from a customer's latest message, and starts again each time they write. Shortly before a reply is due, Aegis emails the person assigned to the ticket. If the time runs out, the ticket shows **BREACHED** and Aegis emails the assignee and your Tenant Owners. Next, [choose the categories customers see](#add-a-category).
## Add a category
Customers choose one of these categories when they raise a ticket, and your team can change it on the ticket later. Category changes save straight away.
Under **Categories**, type in **New category name**.
Select **Add**.
The new category now appears at the end of the list. Next, [rename a category](#rename-a-category) if you need to.
## Rename a category
Select the pencil next to a category.
Change the name.
Select **Save**.
The category now shows its new name. Next, [hide a category](#hide-a-category) that customers should not see.
## Hide a category
Select **Disable** to hide a category from customers. The category now shows as **Inactive**, and its button reads **Enable**. Next, [bring a category back](#bring-a-category-back).
## Bring a category back
If you want a hidden category back, select **Enable**. The category shows as **Active** again. Next, [change the order of categories](#change-the-order-of-categories).
## Change the order of categories
Drag a category by its handle to where you want it. The list keeps the new order. Next, [decide how questions are answered](#answer-questions-before-they-become-tickets).
## Answer questions before they become tickets
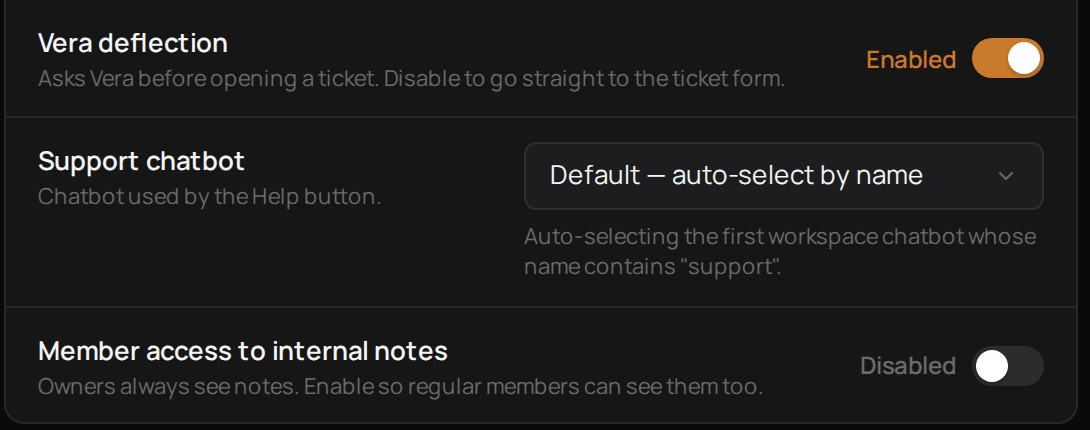 When someone in your workspace selects the lifebuoy icon at the top right and then **Ask Vera**, Vera answers from your knowledge before they raise a ticket.
Use the switch next to **Vera deflection**. When it is off, a question goes straight to the ticket form.
Under **Support chatbot**, pick the Vera chatbot that answers. **Default** lets Aegis choose, starting with any chatbot that has "support" in its name.
Select **Save settings** to keep the switch. The chatbot you pick is saved as soon as you choose it.
Vera now answers from the chatbot you chose. **Deflection analytics** at the top of the page shows how it is doing this month, including the questions it could not answer. To improve its answers, add knowledge to that chatbot in [Vera](/products/vera/overview). Next, [let Workspace Members read internal notes](#let-workspace-members-read-internal-notes).
## Let Workspace Members read internal notes
Tenant Owners and Workspace Admins always see internal notes. You can let Workspace Members read them too.
Turn on **Member access to internal notes**.
Select **Save settings**.
Workspace Members now see the **Internal notes** tab on every ticket. Next, [add an internal note](/products/aegis/customer-tickets#add-an-internal-note).
## Troubleshooting
Ask a Tenant Owner or Workspace Admin to make the change.
Turn on **Vera deflection** first. The chatbot can only be chosen while it is on.
That chatbot cannot answer yet, so questions go straight to the ticket form. Add knowledge to it in [Vera](/products/vera/overview), or choose another chatbot.
When someone in your workspace selects the lifebuoy icon at the top right and then **Ask Vera**, Vera answers from your knowledge before they raise a ticket.
Use the switch next to **Vera deflection**. When it is off, a question goes straight to the ticket form.
Under **Support chatbot**, pick the Vera chatbot that answers. **Default** lets Aegis choose, starting with any chatbot that has "support" in its name.
Select **Save settings** to keep the switch. The chatbot you pick is saved as soon as you choose it.
Vera now answers from the chatbot you chose. **Deflection analytics** at the top of the page shows how it is doing this month, including the questions it could not answer. To improve its answers, add knowledge to that chatbot in [Vera](/products/vera/overview). Next, [let Workspace Members read internal notes](#let-workspace-members-read-internal-notes).
## Let Workspace Members read internal notes
Tenant Owners and Workspace Admins always see internal notes. You can let Workspace Members read them too.
Turn on **Member access to internal notes**.
Select **Save settings**.
Workspace Members now see the **Internal notes** tab on every ticket. Next, [add an internal note](/products/aegis/customer-tickets#add-an-internal-note).
## Troubleshooting
Ask a Tenant Owner or Workspace Admin to make the change.
Turn on **Vera deflection** first. The chatbot can only be chosen while it is on.
That chatbot cannot answer yet, so questions go straight to the ticket form. Add knowledge to it in [Vera](/products/vera/overview), or choose another chatbot.